Double Crunch Honey Garlic Chicken Breasts is a two-stage breading system: a wet flour batter that adheres to the meat, then a dry panko coating that fries into a rigid, audible crust. The math is simple. One coating gives you a soft shell. Two coatings give you structural integrity that survives a sticky glaze without going soggy.
Advertisements1
The honey garlic sauce is where most versions fail. Honey alone burns at 320F (160C) and turns bitter. I cut it with soy sauce, rice vinegar, and a small amount of brown sugar so the glaze caramelizes at a controlled rate and clings instead of pooling on the plate.
Total time is 50 minutes with 6 servings. Each breast half weighs roughly 6 ounces (170g) after trimming, which keeps the cook time predictable at 4 to 5 minutes per side. If your pieces are larger, you are not cooking chicken, you are guessing.
Why You'll Love This Recipe
About the Ingredients
3 large boneless skinless chicken breasts (about 2 lb / 900g total), halved horizontally
Halving gives you 6 pieces at about 6 oz (170g) each, which cook evenly. Buy air-chilled breasts if available; they hold less retained water and brown faster. Substitute boneless thighs, but add 1 minute per side.
1 cup (125g) all-purpose flour
Flour forms the wet batter that grips the meat. Cornstarch is not a 1:1 swap here because it lacks gluten and the batter will slide off. If you need gluten-free, use a 1:1 gluten-free blend with xanthan gum.
2 tsp garlic powder, divided
Divided between batter and panko so garlic flavor exists in two layers. Granulated garlic is stronger than powder; use 1 1/2 tsp if yours is granulated. Onion powder is a reasonable substitute at the same volume.
1 tsp smoked paprika
Adds color and a low smoke note that reads as depth rather than spice. Sweet paprika works if you want zero smoke. Do not use hot paprika unless you want heat in the crust.
1 1/2 tsp kosher salt, plus more for seasoning
Kosher salt dissolves faster in the batter than table salt. If using fine table salt, reduce to 1 tsp. Season the chicken itself before breading, not just the coating.
1 tsp black pepper
Fresh-cracked is worth the 20 seconds. Pre-ground loses volatile oils and tastes flat against the honey. White pepper is a fine substitute if you want less visible specks.
2 large eggs
Eggs bind the flour batter to the meat. Beat them fully; unmixed whites create pockets that steam and blow holes in the crust. Buttermilk substitutes at 3/4 cup (180ml).
1/2 cup (120ml) whole milk
Thins the batter to a pancake-like consistency that coats evenly. Any milk fat percentage works. Oat milk is the best dairy-free option because it has similar viscosity.
3 cups (165g) panko breadcrumbs
Panko's large flakes create the second crunch layer. Standard breadcrumbs produce a denser, greasier crust. Crush panko lightly with your hands if the flakes are very large so they adhere.
1/2 cup (120ml) neutral oil, for shallow frying
Canola, vegetable, or peanut all hold up past 350F (175C). Olive oil smokes too early for this application. You need about 1/4 inch (6mm) of oil in the pan, not a full deep fry.
1/2 cup (170g) honey
Honey is the glaze backbone. Raw honey crystallizes and burns faster; clover or wildflower is more predictable. Maple syrup is a workable substitute but produces a thinner glaze.
1/4 cup (60ml) low-sodium soy sauce
Low-sodium matters because the glaze reduces by roughly 30 percent and concentrates salt. Tamari is a gluten-free substitute. Coconut aminos work but need 1 tsp extra honey to balance.
2 tbsp rice vinegar
Acid cuts the honey's sweetness and keeps the glaze from tasting candy-like. Apple cider vinegar substitutes directly. Lemon juice is sharper; use 1 tbsp only.
4 cloves garlic, minced (about 1 tbsp)
Fresh garlic gives a sharper bite than powder. Jarred minced garlic is acceptable but tastes flatter. Add it off the heat to prevent scorching, which turns it acrid.
1 tbsp unsalted butter
Finishes the sauce and adds gloss. Salted butter works; reduce the soy sauce to 3 tbsp to compensate. Vegan butter substitutes fine here.
2 tsp cornstarch whisked into 2 tbsp cold water
This slurry thickens the glaze so it coats the back of a spoon. Arrowroot works at the same ratio but breaks down faster on reheating.
2 scallions, thinly sliced, for garnish
Adds freshness and visual contrast. Toasted sesame seeds are the other standard garnish. Skip both if you are storing leftovers; they wilt.
Tips & Tricks
Keep one hand dry and one hand wet
Use your left hand for the flour batter and your right for the panko. Cross-contamination between the two bowls creates clumps that fry into raw flour pockets.
Hold oil at 350F (175C), no higher
Above 375F (190C) the panko burns before the chicken hits 165F (74C). Below 325F (163C) the crust absorbs oil and turns heavy. A $15 thermometer solves this permanently.
Glaze off the heat, always
Honey garlic sauce goes from glossy to burnt in under 45 seconds at high heat. Pull the pan off the burner, add the slurry, then return it for 30 seconds only.
- Rest the chicken 3 minutes before saucing: Resting lets internal steam escape so the crust does not steam itself soft from the inside. Sauce after resting, not before.
Pro Tips
Step-by-Step Instructions
1. Prep and halve the chicken
Pat the breasts dry, then slice each horizontally into two even cutlets about 3/4 inch (2cm) thick. Season both sides with 1/2 tsp kosher salt and set aside for 10 minutes while you build the stations. Even thickness matters more than exact weight.
2. Build three breading stations
Whisk flour, 1 tsp garlic powder, smoked paprika, 1 tsp salt, and pepper in bowl one. Whisk eggs and milk in bowl two. Combine panko with the remaining 1 tsp garlic powder in bowl three. Line them up left to right in that order.
3. Bread with the double-coat method
Dredge each cutlet in flour, pressing so the batter adheres, then dip in egg-milk for 5 seconds. Press firmly into panko on both sides. For extra crunch, dip back into egg-milk for 2 seconds and press into panko a second time. Rest breaded pieces on a rack for 5 minutes so the coating sets.
4. Heat oil to 350F (175C)
Pour 1/4 inch (6mm) of neutral oil into a 12-inch skillet and heat over medium-high until a panko flake dropped in sizzles immediately and rises within 2 seconds, or an instant-read thermometer reads 350F (175C). Do not let it exceed 375F (190C).
5. Fry 4 to 5 minutes per side
Lay 2 or 3 cutlets in the pan without crowding; crowding drops the oil temperature and steams the crust. Fry 4 to 5 minutes per side until deep golden brown and the internal temperature at the thickest point reads 165F (74C). Transfer to a wire rack. Work in batches, letting the oil return to 350F (175C) between rounds.
6. Build the honey garlic glaze
Wipe the skillet, then combine honey, soy sauce, rice vinegar, and minced garlic over medium heat. Simmer 2 minutes until it bubbles at the edges and smells nutty, not sharp. Pull the pan off the heat and whisk in the cornstarch slurry, then return to medium for 30 seconds until the glaze coats a spoon.
7. Finish with butter and toss
Off the heat, swirl in the butter until the glaze turns glossy and slightly opaque. Add the chicken back to the pan one piece at a time, turning to coat all sides. The glaze should cling, not run off.
8. Garnish and serve immediately
Plate the cutlets and spoon any remaining glaze from the pan over the top. Scatter sliced scallions across the surface. Serve within 5 minutes; the crust holds its crunch for about 10 minutes under sauce, then softens.
Delicious Variations
Spicy honey sriracha version
Replace 1 tbsp of honey with sriracha and add 1/2 tsp red pepper flakes to the glaze. The heat cuts the sweetness and the crust stays identical.
Air fryer method
Bread as written, spray both sides with oil, and air fry at 400F (204C) for 10 minutes, flipping at the 6-minute mark. Internal temperature still needs to hit 165F (74C).
Baked sheet-pan version
Place breaded cutlets on an oiled rack over a sheet pan and bake at 425F (218C) for 18 to 22 minutes, flipping once. The crust is less shattery but the cleanup is easier.
How to Store Double Crunch Honey Garlic Chicken Breasts
Refrigerator
Store cooled chicken in an airtight container for up to 3 days. Keep the sauce and chicken separate if possible; combined, the crust softens within a few hours.
Freezer
Freeze breaded, unbaked cutlets on a sheet pan for 2 hours, then transfer to a bag for up to 2 months. Fry from frozen at 340F (171C), adding 2 minutes per side. Freezing fully cooked sauced chicken is not recommended; the glaze turns grainy.
Reheating
Reheat in a 375F (190C) oven on a wire rack for 8 to 10 minutes, or in an air fryer at 360F (182C) for 5 minutes. The microwave works but produces a uniformly soft crust within 90 seconds.
Frequently Asked Questions
Q: Why does my honey garlic sauce burn so fast?
Honey has almost no water content, so it hits its scorch point at roughly 320F (160C), far lower than most people expect. Keep the pan at medium heat, add the soy sauce and vinegar early to dilute the sugars, and pull the pan off the burner before adding the cornstarch slurry.
Q: How do I keep the crust crispy after adding the sauce?
Sauce the chicken at the last possible moment and serve within 5 minutes. The double-coat method buys you about 10 minutes of crunch, but no breading survives a glaze indefinitely because moisture migrates from the sauce into the crust.
Q: Can I make this in an air fryer instead of frying?
Yes, and the result is roughly 85 percent as crisp with about 40 percent less oil absorbed. Air fry at 400F (204C) for 10 minutes, flipping at 6 minutes, and always verify 165F (74C) internally because air fryers vary widely in actual temperature.
Q: What internal temperature should chicken breast reach?
165F (74C) at the thickest point, measured with an instant-read thermometer. At that temperature the meat is safe and still juicy; past 175F (79C) the fibers contract and the breast turns dry and chalky.
Q: Can I use chicken thighs instead of breasts?
Yes, and thighs tolerate the fry better because their higher fat content resists overcooking. Use boneless skinless thighs and add 1 minute per side, targeting 175F (79C) internal, which is the texture sweet spot for dark meat.
Run the numbers before you run the recipe. Weigh your chicken, check your oil temperature, and time each side. Consistency in cooking, like consistency in investing, comes from controlling the variables you can measure. Invest in your knowledge.
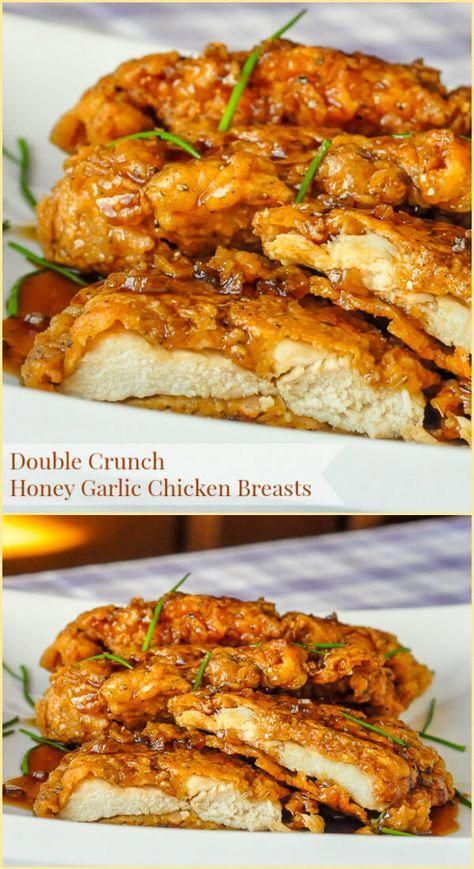
Double Crunch Honey Garlic Chicken Breasts
Double Crunch Honey Garlic Chicken Breasts deliver a shatteringly crisp panko crust glazed in sticky honey garlic sauce, ready in 45 minutes.
🧂 Ingredients
- 3 large boneless skinless chicken breasts (about 2 lb / 900g total), halved horizontally
- 1 cup (125g) all-purpose flour
- 2 tsp garlic powder, divided
- 1 tsp smoked paprika
- 1 1/2 tsp kosher salt, plus more for seasoning
- 1 tsp black pepper
- 2 large eggs
- 1/2 cup (120ml) whole milk
- 3 cups (165g) panko breadcrumbs
- 1/2 cup (120ml) neutral oil, for shallow frying
- 1/2 cup (170g) honey
- 1/4 cup (60ml) low-sodium soy sauce
- 2 tbsp rice vinegar
- 4 cloves garlic, minced (about 1 tbsp)
- 1 tbsp unsalted butter
- 2 tsp cornstarch whisked into 2 tbsp cold water
- 2 scallions, thinly sliced, for garnish
📋 Instructions
- 1Prep and halve the chicken — Pat the breasts dry, then slice each horizontally into two even cutlets about 3/4 inch (2cm) thick. Season both sides with 1/2 tsp kosher salt and set aside for 10 minutes while you build the stations. Even thickness matters more than exact weight.
- 2Build three breading stations — Whisk flour, 1 tsp garlic powder, smoked paprika, 1 tsp salt, and pepper in bowl one. Whisk eggs and milk in bowl two. Combine panko with the remaining 1 tsp garlic powder in bowl three. Line them up left to right in that order.
- 3Bread with the double-coat method — Dredge each cutlet in flour, pressing so the batter adheres, then dip in egg-milk for 5 seconds. Press firmly into panko on both sides. For extra crunch, dip back into egg-milk for 2 seconds and press into panko a second time. Rest breaded pieces on a rack for 5 minutes so the coating sets.
- 4Heat oil to 350F (175C) — Pour 1/4 inch (6mm) of neutral oil into a 12-inch skillet and heat over medium-high until a panko flake dropped in sizzles immediately and rises within 2 seconds, or an instant-read thermometer reads 350F (175C). Do not let it exceed 375F (190C).
- 5Fry 4 to 5 minutes per side — Lay 2 or 3 cutlets in the pan without crowding; crowding drops the oil temperature and steams the crust. Fry 4 to 5 minutes per side until deep golden brown and the internal temperature at the thickest point reads 165F (74C). Transfer to a wire rack. Work in batches, letting the oil return to 350F (175C) between rounds.
- 6Build the honey garlic glaze — Wipe the skillet, then combine honey, soy sauce, rice vinegar, and minced garlic over medium heat. Simmer 2 minutes until it bubbles at the edges and smells nutty, not sharp. Pull the pan off the heat and whisk in the cornstarch slurry, then return to medium for 30 seconds until the glaze coats a spoon.
- 7Finish with butter and toss — Off the heat, swirl in the butter until the glaze turns glossy and slightly opaque. Add the chicken back to the pan one piece at a time, turning to coat all sides. The glaze should cling, not run off.
- 8Garnish and serve immediately — Plate the cutlets and spoon any remaining glaze from the pan over the top. Scatter sliced scallions across the surface. Serve within 5 minutes; the crust holds its crunch for about 10 minutes under sauce, then softens.

Marcus writes about personal finance and investing, with a focus on helping young professionals build wealth from scratch. He breaks down complex concepts into simple, actionable strategies.