Honey garlic chicken is a classic weeknight hero: sweet, savory, and sticky, it delivers bold flavor with minimal effort. This version uses boneless, skinless thighs, which stay juicy and forgiving even if you're not a precise cook. The sauce is a simple balance of honey, soy sauce, garlic, and a touch of vinegar to cut the sweetness.
Advertisements1
I've tested this recipe multiple times to dial in the perfect ratios. The result is a glaze that clings to the chicken without being cloying, and a cooking method that gives you a beautiful caramelized exterior. Whether you serve it over rice, noodles, or with steamed vegetables, it's a guaranteed crowd-pleaser.
Unlike many recipes that call for chicken breast, thighs are more forgiving and less likely to dry out. They also absorb the honey garlic glaze better, giving you a more flavorful bite. Let's get cooking.
Why You'll Love This Recipe
About the Ingredients
1.5 lbs (680g) boneless, skinless chicken thighs
Thighs stay juicy and are more forgiving than breasts. Substitute with chicken breasts if preferred, but reduce cook time by 2-3 minutes per side.
1/3 cup (80ml) honey
Use a mild honey like clover or orange blossom for a clean sweetness. If honey is crystallized, warm it slightly to liquefy.
1/4 cup (60ml) low-sodium soy sauce
Low-sodium prevents the dish from becoming too salty. For gluten-free, use tamari or coconut aminos.
3 cloves garlic, minced
Fresh garlic is key; avoid pre-minced for better flavor. If you only have garlic powder, use 1/2 teaspoon.
1 tablespoon rice vinegar
Adds a subtle tang to balance the sweetness. Substitute with apple cider vinegar or white wine vinegar.
1 tablespoon olive oil
For searing the chicken. Use a neutral oil like canola if preferred.
1/2 teaspoon red pepper flakes (optional)
Adds a gentle heat. Omit for a milder version, or increase to 1 teaspoon for more kick.
1 tablespoon cornstarch mixed with 2 tablespoons water (slurry)
Thickens the sauce to a glossy finish. For a gluten-free alternative, use arrowroot powder.
Sesame seeds and sliced green onions for garnish
Optional but adds texture and color. Toasted sesame seeds enhance the nutty flavor.
Tips & Tricks
- Pat the chicken thighs dry with paper towels before seasoning. Excess moisture prevents a good sear and leads to steaming instead of browning.
- Don't overcrowd the pan. Sear the chicken in batches if necessary to ensure each piece gets a golden crust. Overcrowding lowers the pan temperature and results in soggy chicken.
- Simmer the sauce after adding the slurry until it reaches a syrupy consistency. If it's too thin, it won't cling to the chicken; if too thick, it may become sticky and caramelize too quickly. Watch for a glossy, coating texture.
Pro Tips
Step-by-Step Instructions
1. Season the chicken
Pat chicken thighs dry with paper towels. Season both sides with salt and pepper. This enhances flavor and promotes browning.
2. Heat the oil
In a large skillet, heat olive oil over medium-high heat until shimmering (about 375°F/190°C). Swirl to coat the pan evenly.
3. Sear the chicken
Place chicken in a single layer, skin-side down if any. Sear for 4-5 minutes until golden brown and easily releases from the pan. Flip and cook another 4-5 minutes until the internal temperature reaches 165°F (74°C). Remove chicken to a plate.
4. Make the sauce
In the same skillet, reduce heat to medium. Add honey, soy sauce, garlic, rice vinegar, and red pepper flakes. Stir to combine, scraping up any browned bits from the pan.
5. Thicken the sauce
Bring the sauce to a gentle simmer. Whisk in the cornstarch slurry and cook for 1-2 minutes, stirring constantly, until the sauce thickens and coats the back of a spoon.
6. Coat the chicken
Return the chicken to the skillet, turning to coat each piece in the sauce. Simmer for 2-3 minutes, allowing the sauce to glaze the chicken.
7. Garnish and serve
Sprinkle with sesame seeds and green onions. Serve immediately over rice, noodles, or with vegetables.
Delicious Variations
Spicy Honey Garlic
Add 1-2 teaspoons of Sriracha or gochujang to the sauce for a fiery kick.
Citrus Honey Garlic
Replace the rice vinegar with orange juice and add a teaspoon of orange zest for a bright, fruity twist.
Coconut Honey Garlic
Stir in 1/2 cup of coconut milk with the sauce for a creamy, Thai-inspired version.
How to Store Honey Garlic Chicken
Refrigerator
Store in an airtight container for up to 4 days. The flavors will deepen as it sits.
Freezer
Freeze in a sealed container for up to 3 months. Thaw overnight in the fridge before reheating.
Reheating
Reheat in a skillet over medium heat until warmed through, adding a splash of water or chicken broth to loosen the sauce if needed.
Frequently Asked Questions
Q: Can I use chicken breast instead of thighs?
Yes, you can use chicken breast. However, reduce the searing time to 3-4 minutes per side and cook until the internal temperature reaches 165°F (74°C) to avoid dryness. Thighs are more forgiving and flavorful.
Q: How do I prevent the honey garlic sauce from burning?
Keep the heat at medium or medium-low after adding the honey and soy sauce. Sugar in honey can burn quickly at high heat. Also, stir frequently and watch for a gentle simmer, not a rapid boil.
Q: Can I make this honey garlic chicken in an air fryer?
Yes, you can. Air fry the seasoned chicken at 375°F (190°C) for 12-15 minutes, flipping halfway, until cooked through. Then toss the chicken in the sauce made on the stovetop, and return to the air fryer for 2-3 minutes to glaze.
Q: Is this honey garlic chicken gluten-free?
To make it gluten-free, use tamari or coconut aminos instead of soy sauce. Also, ensure your cornstarch is certified gluten-free (most are). All other ingredients are naturally gluten-free.
If you tried this honey garlic chicken, let me know in the comments below! Share your substitutions and how it turned out. Invest in your knowledge.
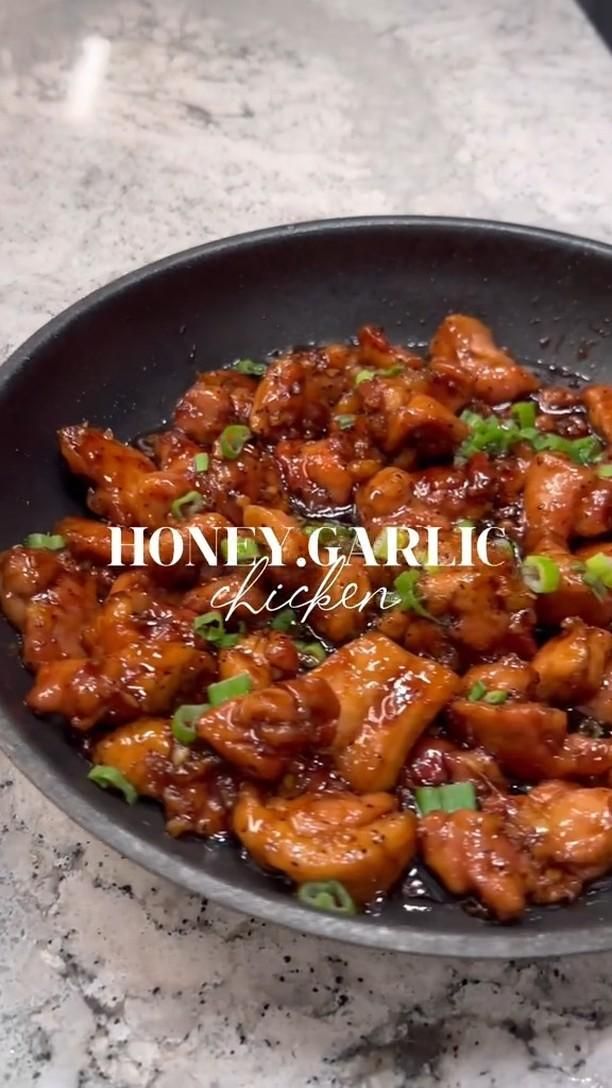
Honey Garlic Chicken
How To Make Honey Garlic Chicken – juicy chicken thighs in a sweet-savory glaze, ready in 30 minutes for a quick, satisfying weeknight meal.
🧂 Ingredients
- 1.5 lbs (680g) boneless, skinless chicken thighs
- 1/3 cup (80ml) honey
- 1/4 cup (60ml) low-sodium soy sauce
- 3 cloves garlic, minced
- 1 tablespoon rice vinegar
- 1 tablespoon olive oil
- 1/2 teaspoon red pepper flakes (optional)
- 1 tablespoon cornstarch mixed with 2 tablespoons water (slurry)
- Sesame seeds and sliced green onions for garnish
📋 Instructions
- 1Season the chicken — Pat chicken thighs dry with paper towels. Season both sides with salt and pepper. This enhances flavor and promotes browning.
- 2Heat the oil — In a large skillet, heat olive oil over medium-high heat until shimmering (about 375°F/190°C). Swirl to coat the pan evenly.
- 3Sear the chicken — Place chicken in a single layer, skin-side down if any. Sear for 4-5 minutes until golden brown and easily releases from the pan. Flip and cook another 4-5 minutes until the internal temperature reaches 165°F (74°C). Remove chicken to a plate.
- 4Make the sauce — In the same skillet, reduce heat to medium. Add honey, soy sauce, garlic, rice vinegar, and red pepper flakes. Stir to combine, scraping up any browned bits from the pan.
- 5Thicken the sauce — Bring the sauce to a gentle simmer. Whisk in the cornstarch slurry and cook for 1-2 minutes, stirring constantly, until the sauce thickens and coats the back of a spoon.
- 6Coat the chicken — Return the chicken to the skillet, turning to coat each piece in the sauce. Simmer for 2-3 minutes, allowing the sauce to glaze the chicken.
- 7Garnish and serve — Sprinkle with sesame seeds and green onions. Serve immediately over rice, noodles, or with vegetables.

Marcus writes about personal finance and investing, with a focus on helping young professionals build wealth from scratch. He breaks down complex concepts into simple, actionable strategies.